
Here’s the truth: You don’t necessarily need expensive equipment and software to capture eye-catching, clear images for your brand’s social media. Many of us have a remarkable piece of technology in our hands nearly all day, every day: the iPhone. You can utilize your device to improve your social media game and lure your customers in with stunning images. Here are some tips for taking photos with your iPhone:

Hold your phone at the right angle.
When you are taking a photo with your iPhone, your phone should be straight up and down. For this, we suggest turning on your camera grid. To do this, go to Settings > Photos & Camera > and turn “Grid” on. This feature will help you to align all lines in the photo with the grid on your camera. It will keep your photos looking clean with no crooked or odd angles!
Find the ideal lighting.
The main goal of lighting in a photo should be to get bright, natural, even lighting. The best way to achieve this is to use natural light let off by the sun, rather than indoor lamps and bulbs. If you must shoot indoors, we suggest that you find the most even lighting possible, with no shadows cast over the subject(s) of the photo. To take your photo, go near a window that lets in a lot of natural light and turn off any lights inside, as the mixture of fluorescent and natural light can be unappealing. If it’s very sunny outside, do not stand right in front of the window and photograph in the direct sun, but rather go slightly away from the window so that the room is still well-lit, but not shadowy. Remember that when it comes to taking iPhone photos, shadows are almost never your friend. If you’re shooting outdoors on a sunny day, find even shade to photograph by, such as next to a building that is shielding the sun.
Don’t zoom.
Zooming on your camera, even slightly, drastically decreases the quality of the photo. We suggest that you either get closer or skip taking photos that require you to zoom.
Utilize the camera’s brightness adjuster.
Many people don’t know that iPhones give you the ability to adjust brightness/exposure while taking a photo! This can be very beneficial because once a photo is overexposed, the detailing in the photo can rarely be salvaged. To use this feature, just touch the screen to focus the subject like you would normally do. Once you do this, you will see a little sun graphic pop up next to where you clicked. You can drag the sun up and down to adjust the brightness of your photo and get it just right! Below is a visual of this process using a box of Kleenex:
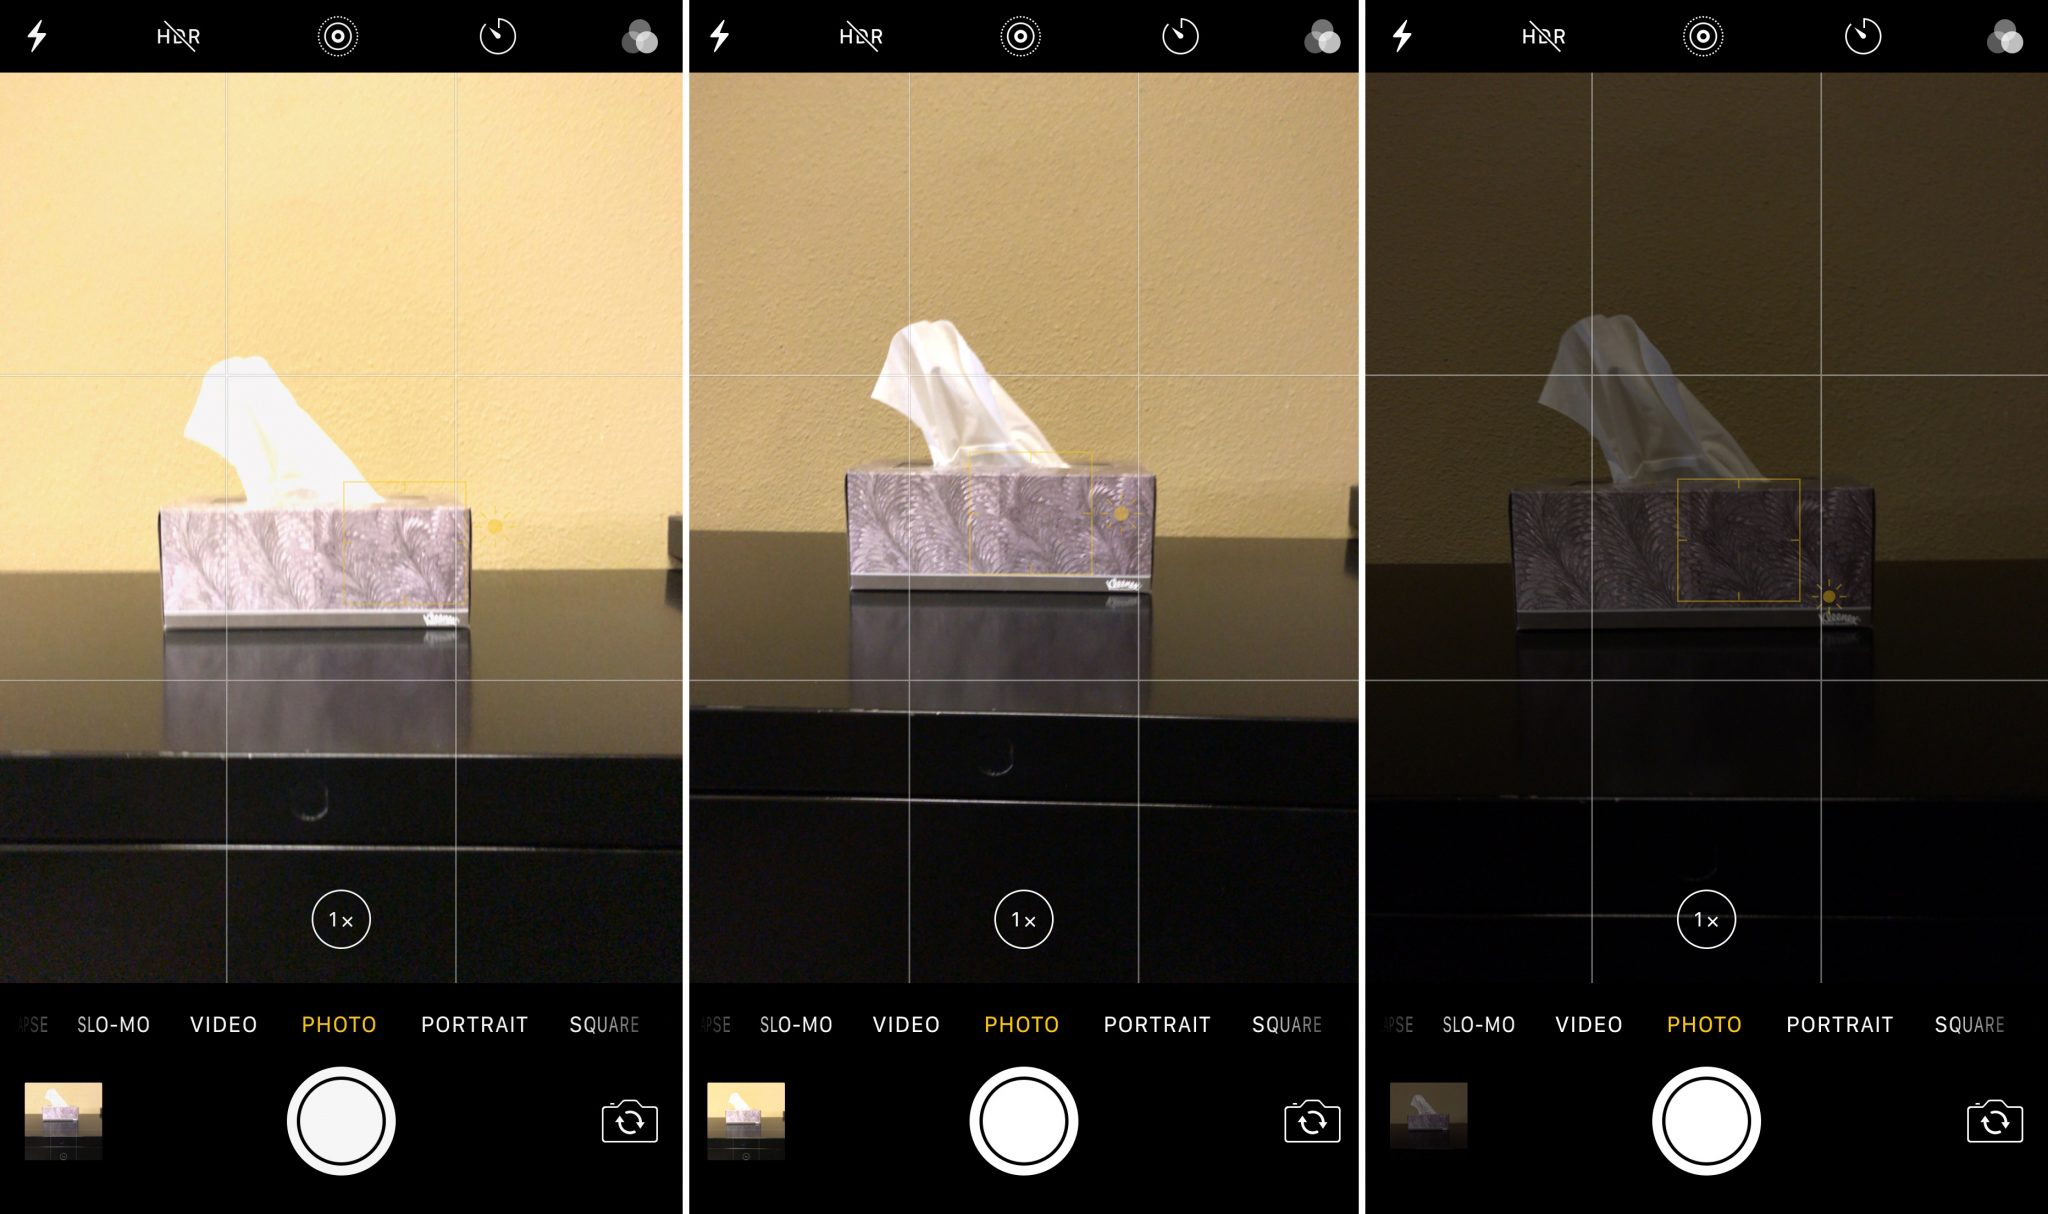
As you can see, the middle image features the correct amount of brightness, while the photo on the left is overexposed and the photo on the right is too dark. You can see that in the overexposed photo, the crinkles of the Kleenex are nearly impossible to see, and this is what we’re trying to avoid. Overexposed photos lose details, and lowering the exposure after taking the photo will not allow you to get those details back. This tool can help you to adjust your exposure to be just right before snapping the photo!
Use portrait mode when photographing people.
If you or someone in your business has an iPhone 7 or 8 Plus or the iPhone X, we’re sure you’re aware of the glory that is portrait mode. This mode is an amazing tool to elevate the quality of your iPhone photos. It blurs out the background of images, making them look as though they were taken with a professional camera lens. In order to fully utilize this tool, we suggest that you follow the directions on your phone when it tells you to move closer or farther away from your subject. We also suggest that you tap on the subject’s face in order to focus the camera on them before snapping the photo. If you’re careful and meticulous, portrait mode will allow you to create beautiful images using your iPhone.
Steady yourself.
iPhones are very touchy, so it’s important to remain very steady when taking a photo. If you have nothing to balance on, we suggest holding your elbows close to your side in order to stabilize your arms against your body. If you have other stationary objects to lean on or balance your phone on, that works great too. The bottom line is that shaky, blurry photos are the worst. Don’t take them!
If you master these tips and tricks, your social media photos can be improved tenfold. The major appeal behind iPhone photos is that they can be taken anywhere and everywhere your phone is; in this day and age, we’d like to think that’s most places. iPhone photography is an amazing way for brands to share their stories on social media, without the complicated and expensive equipment.
Stay tuned for our upcoming blog post that will give tips and tricks on how to edit photos with your iPhone! For additional questions, contact us!